Cluster Shared Volume (CSV) = shared storage that can be used by multiple nodes in a cluster to simultaneously read and write without corrupting the disk. This is equivalent to Virtual Machine File System (VMFS) on VMware.
In a very simple form the cluster would have a master node that would commit any changes to the disk. For example if we had a 4 node cluster as below:
Node 1 – Master
Node 2 – Slave
Node 3 – Slave
Node 4 – Slave
And if Node 3 wanted to commit any changes then these would be executed by Node 1.
We can present shared storage to nodes (hosts) by setting the storage up as an iSCSI target.
Below is a quick example:
Utilising Storage Spaces (previous blog) we can set up a Storage Pool and from the Storage Pool we can carve out a “virtual disk”.
Under Server Manager -> File and Storage Services -> Storage Pool -> New Virtual Disk
The New Virtual Disk Wizard will start. Under “Virtual Disk Name” section specify a name you will give this Virtual Disk and a description.
Then click “Next”.
Specify the “Storage Layout” option either:
Simple, Mirror or Parity (explained in detail in previous blog post).
I have selected “Parity” then click “Next”.
Specify if you want the disk to dynamically grow (thin provisioned) or fixed in size. This depends on workload you wish to run. As this is a lab I have selected “Thin” then click “Next”.
Decide upon the size of the disk and then click “Next”.
Verify the information you have selected through each option and click “Create”.
If no anomalies you should see a successful message of the disk being setup. Click “Close”.
The “New Volume” Wizard will pop up straight after. This can be configured later if required.
Select the “Server” and “Disk” then click “Next”.
Specify the size of the volume. We setup a 5GB Virtual Disk.
From this we can set up multiple volumes if need be.
I have chosen the full size 5GB. Then click “Next”.
Select a “Drive Letter” and click “Next”.
Give a descriptive “Volume label” for reference point. Then click “Next”.
Again if no anomalies then you should see a successful message. Click “Close”.
We can now see the VDISK_iSCSI virtual disk (LUN) created and displayed as Volume E:
Setup an iSCSI virtual disk (LUN) which you will use as shared storage between HV1 (node) and HV2 (node) for CSV.
Under File and Storage Services -> iSCSI -> select “New iSCSI Virtual Disk”.
Underlying delivery mechanism = iSCSI.
The iSCSI Virtual Disk Wizard will start. Select “Server” and “Volume” then click “Next”.
Give the iSCSI virtual disk a name and then click “Next”.
Specify iSCSI virtual disk size and then click “Next”.
If this was a SAN you would be specifying the LUN size. As this is a lab I am specifying “Dynamically expanding”.
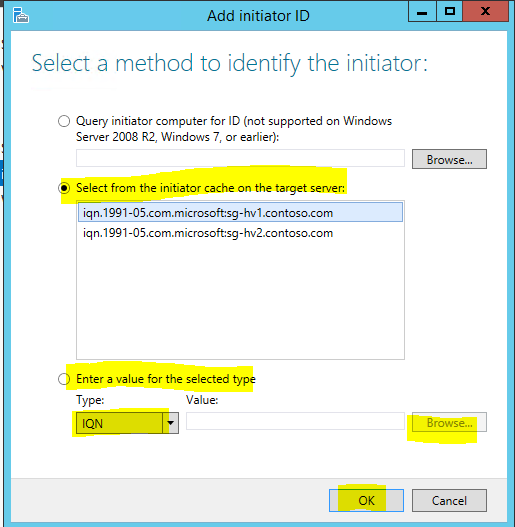
Assign iSCSI target. These are the servers that will be able to use the iSCSI Virtual Disk. Select “New iSCSI target” and click “Next”.
Specify name and description. When connecting later this name will be important for identification!
Click “Next”.
Recommended to use IQN as this is very unlikely to change in an environment compared to IP and DNS. This way you minimise disruptions to your storage setup. Browse for the servers that will have access to the iSCSI disk(s) and click “OK”.
Once added click “Next”.
As this is a lab environment I am not setting up CHAP. In a production environment you would want to make your environment as secure as possible so I would highly recommend using CHAP as an added layer of protection. Click “Next”.
Verify your selections and click “Create”.
If no anomalies you should get a successful message. Click “Close”.
The iSCSI_LUN or virtual disk will show as “not connected” until there is an active connection from the access servers specified. In this instance it’s SG-HV1 and SG-HV2.
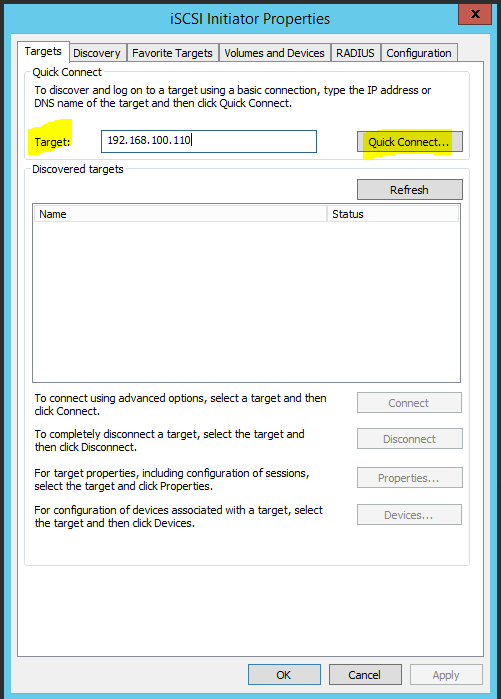
Jump over to the Hyper-V host(s) – SG-HV1 and SG-HV2 and start iSCSI Initiator wizard from Start – Run.
Under “Targets” give the Storage server IP or DNS Name and select “Quick Connect”.
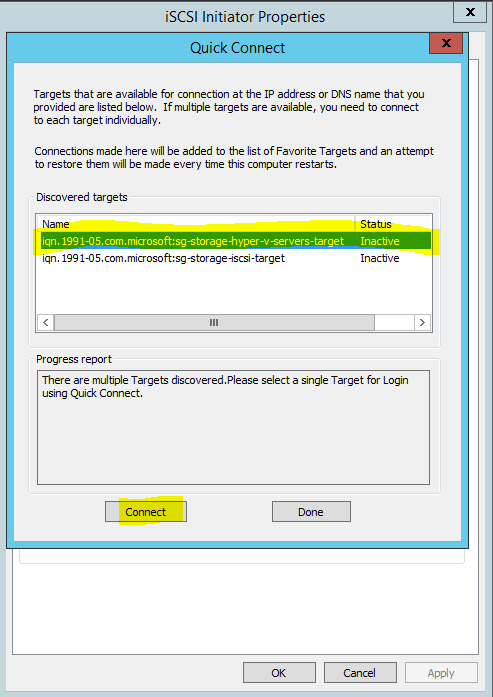
On the pop up window select the “discovery targets” and click “Connect” and then “Done”.
Note the name we gave earlier matches.
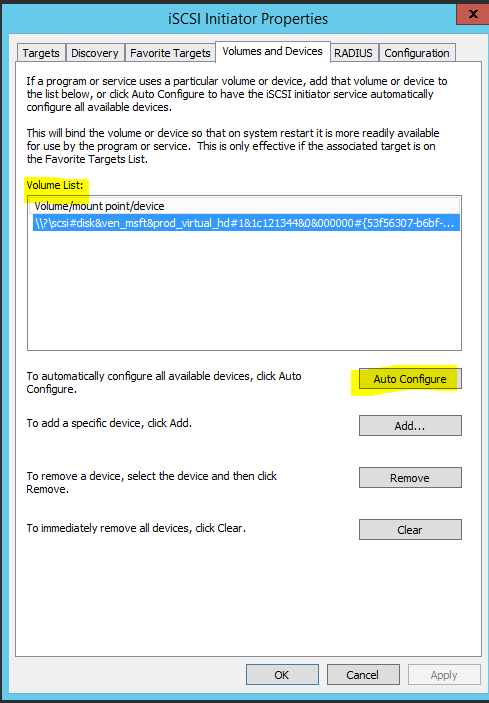
Next go to “Volumes and Devices” and select “Auto Configure” this should mount the iSCSI disk (LUN) onto the server. Do the same process for all the nodes that you wish to have the LUN present.
i.e. SG-HV1 and SG-HV2. Then select “OK”.
Then when you look under Disks section (either SG-HV1 or SG-HV2) you can see the iSCSI “LUN” of 5GB being presented to both nodes.
As you can see the disk is “online” and “usable” as iSCSI target on both SG-HV1 and SG-HV2 which you would expect like a SAN presenting iSCSI LUN to multiple hosts.
This can be used as a CSV once you have your cluster setup which we will describe in another blog post.
Hopefully I haven’t confused you 🙂
Good Luck!


