
A good way to familiarise yourself with a function within Azure is to set one up and play around. Same applies to Azure Active Directory. Whenever a new Azure Subscription is set up there is an Azure Active Directory that goes with it. Same with Office 365 (O365), although you don’t see this, under the hood there is an Azure Active Directory that holds the users etc…
When you sign up using your Live ID the Azure Directory will always add the Live ID to your Active Directory name followed by “.onmicrosoft.com”.
Example: myawesomeliveID@outlook.com, the outcome will most likely be myawesomeliveidoutlook.onmicrosoft.com because both names have to be unique. You can do many things like adding custom names and also change the name to something else by setting up another “tenant” in your Subscription and associate it.
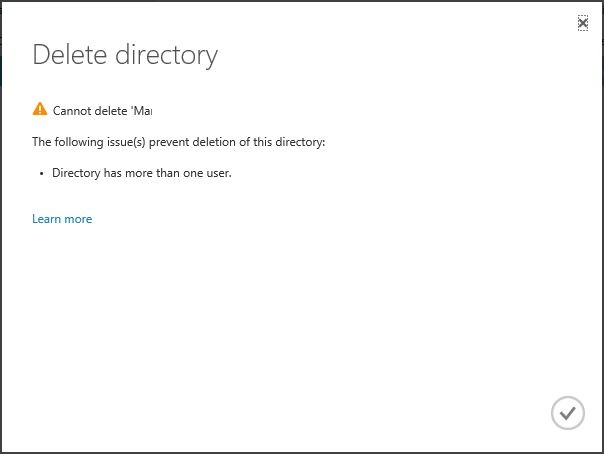
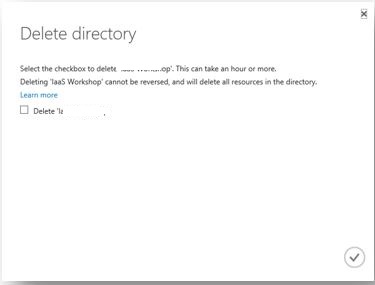
Once you’re done and want to clean up your environment you can follow the below process:
Note: Sometimes its matter of selecting the tenant you would like to remove and hitting delete. Most often you might encounter problems like below (although you might have cleaned up the environment), therefore I have outlined few extra steps:
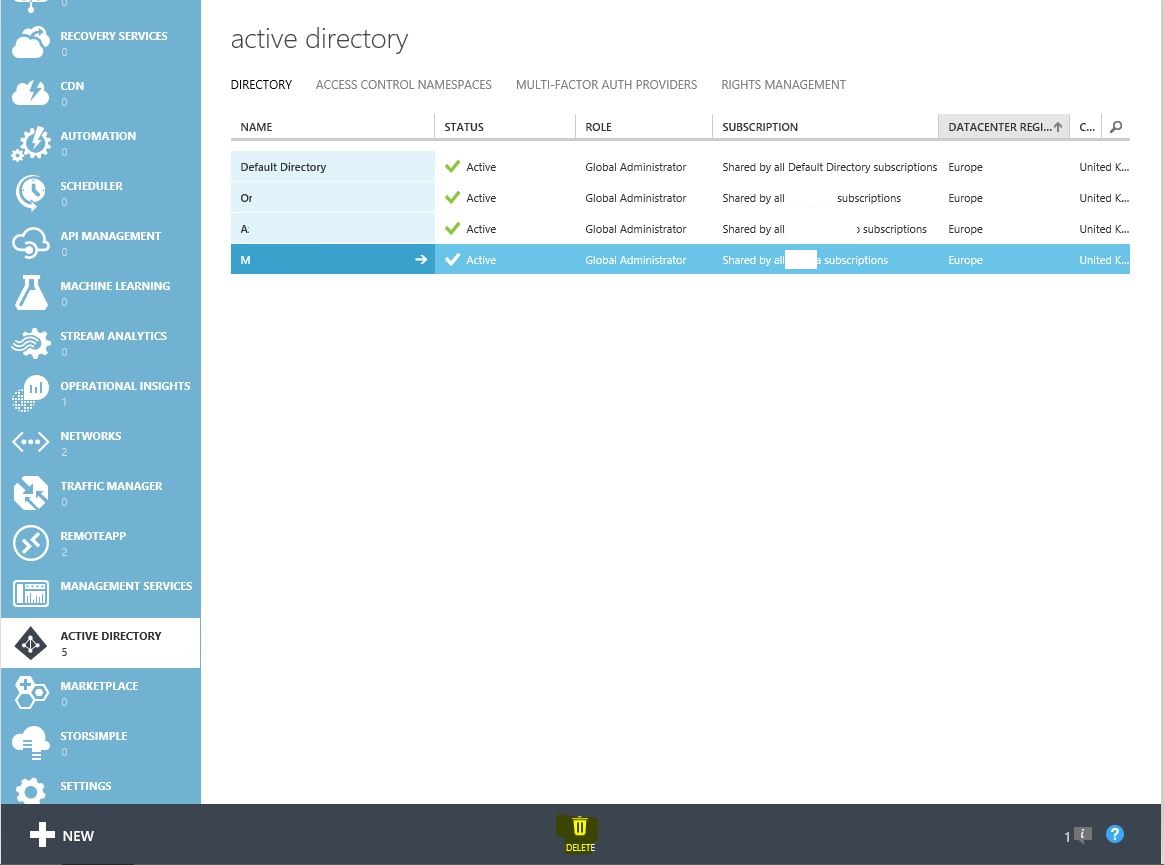
Note: As of this writing the Azure Active Directory management is done via the classic portal: https://manage.windowsazure.com
- First remove all users and groups
- Remove any applications you have set up
- If you have enabled premium trial you will need to wait for it to expire
- Disable Directory Synchronization if you have enabled it
If you have set up quite few users through say, PowerShell it could be tedious to go and delete every singe one. Follow the below steps to delete all at once:
- Download Azure Active Director for Windows PowerShell (64-bit version) Link: Azure Active Directory Module for Windows PowerShell (64-bit version)
- Connect to Azure Active Directory PowerShell with a Global Administrator account. If you don’t have one set one up as a Global Administrator
- Run the following command:
- Connect-MsolService (You will be prompted to enter the credentials of a Global Administrator – don’t use your Live ID).
- Example: AADSync@myawesometenant.onmicrosoft.com (username)
- Connect-MsolService (You will be prompted to enter the credentials of a Global Administrator – don’t use your Live ID).
- In order to remove all synchronised Groups for Azure Active Directory, issue this command:
- Get-MsolGroup | Remove-MsolGroup -Force
![]()
- In order to remove all synchronized Users from Azure Active Directory, issue this command:
- Get-MsolUser –All | where {$_.UserPrincipalName –notlike “*#EXT#*”} | Remove-MsolUser -Force
- It’s expected you get the error message like below as you can’t remove your own account you’re running this command from

Note: Don’t issue the command:
- Get-MsolUser -All | Remove-MsolUser -Force as this will remove your Live ID and you will no longer see the tenant in your Subscription.
Help is at hand:
The following blog post explains the process to reinstate the user if deleted accidentally:
Azure AD disappeared from management portal
http://superuser.com/questions/1051075/azure-ad-disappeared-from-azure-management-portal
Command to run: Restore-MsolUser -UserPrincipalName “Live ID”
- Finally go into the tenant and delete your own account apart from the Live ID and select “delete”. This should remove it.

Additional references:
https://support.microsoft.com/en-us/kb/2967860
https://msdn.microsoft.com/en-us/library/azure/jj151815(v=azure.98).aspx
https://azure.microsoft.com/en-gb/documentation/services/active-directory/
